Using the Sites Editor
- Cliff Hales
Analytics
Easy Rides Sites Editor
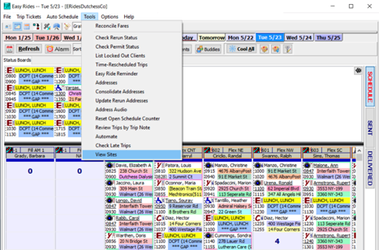
The new Easy Rides Sites Editor is a simple and intuitive way for users to make changes to the sites that make up their service area, accessible from the main Easy Rides menu under Tools the menu item is titled “View Sites”. The Sites Editor has all of the standard mapping features you expect from Easy Rides including pan and zoom controls, map and satellite views, switchable metric and imperial distance scales, and others, but it also offers much more.
The Sites Editor has a read only mode so that it can be accessed by any user, allowing simple viewing of sites and service areas even for users logged in as Read Only. In order to make changes to site shapes however the user accessing the form must have Geography Modification permissions.
The Sites Editor is designed to be as intuitive as possible, offering full details about each site while not cluttering the users view with too much data or too many controls.
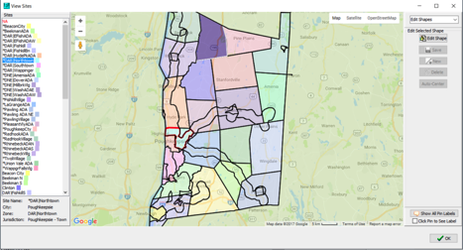
All sites will be listed on the left-hand side, each with a sample of their associated color while sites that do not have an associated shape and color will be listed with red text. When a user selects a site from the list that site will be highlighted on the map with a red boarder and, if the user has the appropriate permissions, be available for editing with the Edit Shape button in the top-right of the form becoming enabled. Further details about the selected site will be shown below the sites list, including the name, city, zone, and jurisdiction of that site. These details can similarly be shown by clicking on one of the sites directly on the map, opening a small info window for that site with the same helpful information displayed.
For additional ease of use, a user can double-click on a site in the list to automatically zoom in and center the map to that shape or, conversely, double-click a site on the map to select that site in the list and make it available for editing.
Once a site is selected changing its shape through the Sites Editor is a very simple process. When a user clicks the Edit Shape button moveable points will be shown at each corner of the site and a pushpin will be displayed that marks the center of that site. To change the shape simply click and drag an existing corner to move it or click and drag one of the translucent circles shown between each corner to create a new corner.
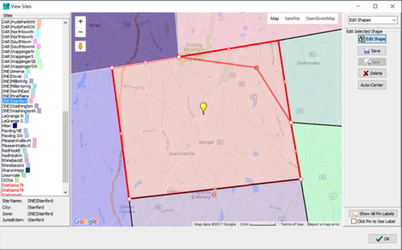
Changing the center marker for a site is just as easy as making other changes, simply click and drag the displayed marker to change its position or click the Auto-Center button on the right-hand side to automatically place the marker at the geographic center of that shape.
If you make a mistake while editing a site don’t worry, each time you move an existing corner or create a new one a small button will be displayed on that corner that, if clicked, will undo the last change that was made. Additionally, the changes made are not saved automatically but rather held for each shape until the Save button is clicked on the right-hand side, so if a user makes a set of changes they are not satisfied with it is always possible to simply select another site or close the form before saving and discard the changes that were made.
Finally, the New and Delete buttons are available for cases where more substantial changes to sites or service areas need to be made. Deleting the shape for a given site is a very easy process, when the Delete button is pressed the user will be prompted with a confirmation dialog to make sure the button was not clicked by mistake and the shape will be removed so that a new one can be drawn from scratch.
Creating a new shape is a slightly more involved process but will still be very intuitive for most users. The New button will only be enabled when editing a site that does yet have a shape on the map or after that shape has been deleted. When the New button is clicked, the user will be shown a message explaining the simple click-to-draw method used for creating a new shape, just click 3 points on the map to use as corners for the new shape and then continue editing the shape like normal. To avoid confusion users will find that only one of the New and Delete buttons will ever be enabled at a given time, the Delete button is enabled only if the selected site has an associated shape and otherwise the New button will be enabled.
Once a user has finished making the desired changes, all they have to do is click Save and then they are free to close the form and continue their work. Closing the Sites Editor, as well as selecting a different site from the list, without saving first will discard any changes that were made, but don’t worry, any time you close the form or select a new site while in Edit Mode you’ll be reminded to save any changes first.
Related articles