Easy Rides Release 3.3.18
To activate 3.3.18:
- Run the ERAutoUpdater. This will open a command prompt window and will download the latest version. When complete, it will say "Press any key to continue". Press any key.
- After the autoupdater is done, close any open copies of Easy Rides and re-open them.
- This only needs to be done by one person. It is not necessary to run the autoupdater on other workstations.
This will update Easy Rides, and back up your existing software version in case you want to roll it back.
Combined Mapping
This feature allows you to add additional geographical information on a selected map in Easy Rides. The items you can add depend on which map you've got open. For instance, you can right click on a trip ticket, click "Show This Trip on Map" and see the starting and end points on a map with distance, path and time information. On this map you can add other addresses, segment info, sites, the AVL map and KML layers. Details for the combined map options are described later on this page.
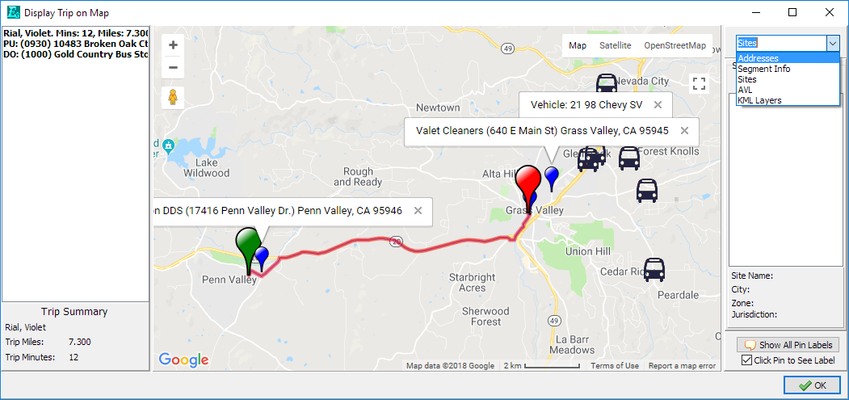
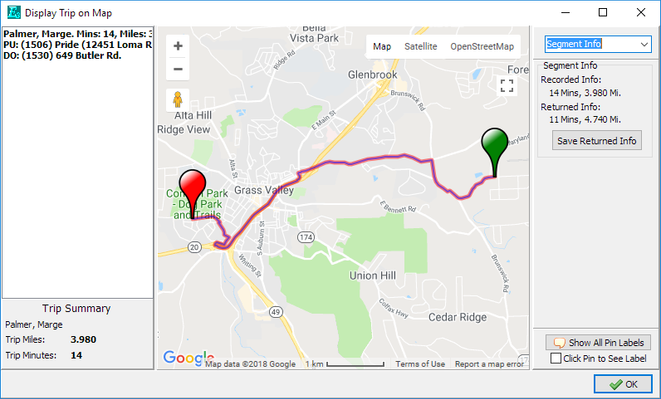
Show Trip on a Map
From the AVL Map you have most of the same options, but you can also add Historical AVL and Next Stops.

AVL Map
To use the combined mapping, from any map display in Easy Rides, click on the drop down in the upper right hand corner. Select what you want to add to the map, which also re configures the area of the form to display related options. Details of the various combined map options are explained below.
Historical AVL, Addresses, Sites and Next Stops
Historical AVL
Using the Historical AVL feature
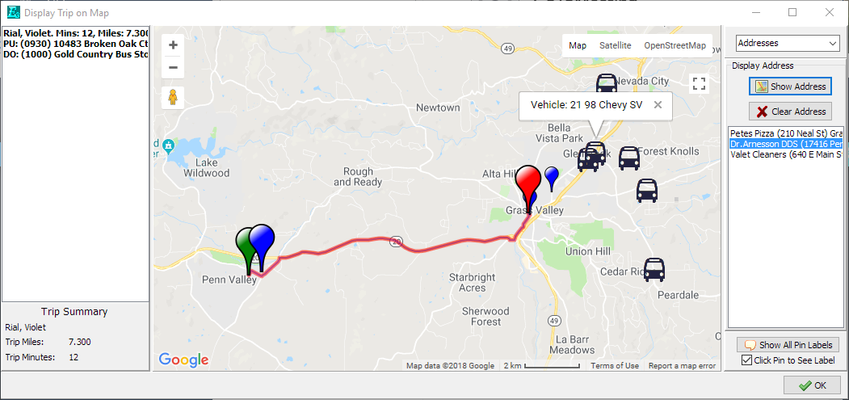
Addresses
Allows you to add addresses to the active map. You can add more than one. After selecting the Addresses drop down the Show Address and Clear Address buttons are displayed. The Show Address button will open the address dialogue (like you see in trips or clients) where you can search for an address. After searching, double click it to pick it - just like in a trip - and that will display it on the map. Repeat the process while the map window is open to add more addresses. Once loaded, the addresses will display on a list below the buttons. The Clear Address button is inactive until you click on a loaded address.
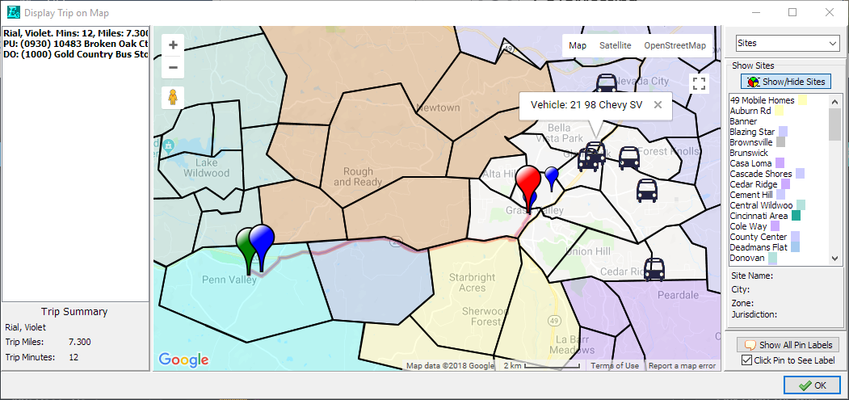
Sites
Displays your service area sites and zones overlaid on the map. After you select Sites from the drop down menu, click the Show/Hide Sites button. The speed of loading the sites depends greatly on how many sites you have, how complex (how many points there are) and network/server speed. If you have a complex service area, it make take more than just a few seconds to load all of the shapes on the map.
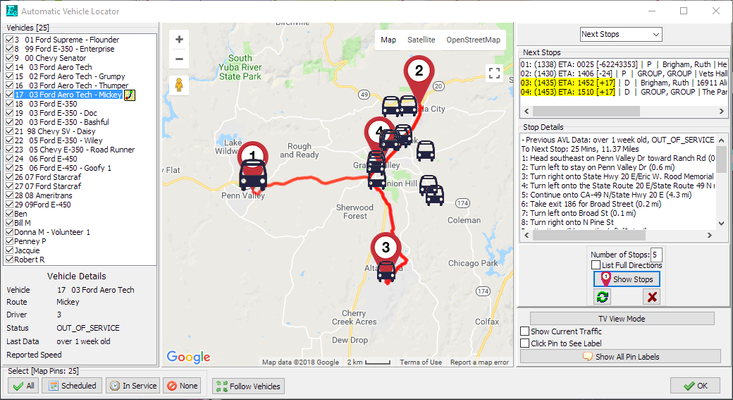
Next Stops
Displays the next stops (not yet performed) on a driver's manifest for the selected vehicle. First, click on a vehicle from the list on the left side of the screen. You do not have to un-check other vehicles, you just need to have the one you want to see the stops for selected, but it may help de-clutter and make it easier to visualize. Once a vehicle is selected, enter the Number of Stops you want to see and then click Show Stops. Use the green Refresh button with the arrows in a circle if the map has been open for a while and you want to refresh the view of stops for the same selected vehicle. If you want to look at a different vehicle, click the Grey button with the red X to clear out the stops from the map or prior to selecting another vehicle. You'll notice that the stops may be in yellow (if the vehicle is projected to be late but less than 30 min late) or red (if the stop is going to be 30 min or more late) or no shading if it is projecting an on-time or could be early arrival.
KML Layers
Allows overlay on map of previously configured .kml file (Google Maps/Google Earth formatted file that contains data points but no map). For this to work, you must first use the ERUtility to designate the URL for the download of your .kml file. Once that is setup, Easy Rides will then be able to display the KML Layers the next time it is opened and you use the feature. First, we'll look at the feature and later we'll show how to set it up.
Use KML Layers
Open the AVL Map and use the drop down in the upper right corner of the map window to select AVL.
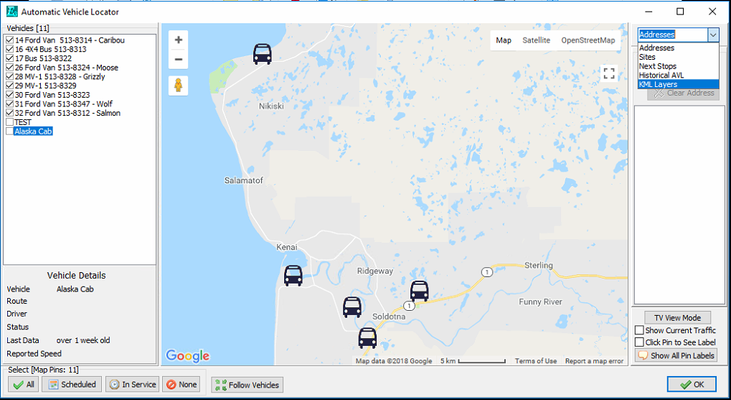
Next, click on the KML Layer you want to see.
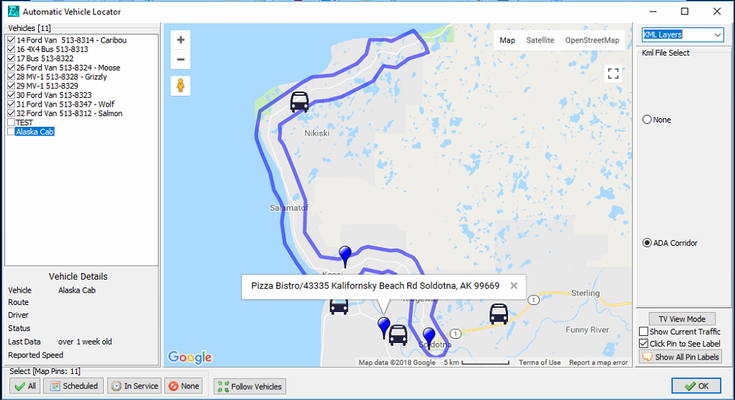
This example shows the vehicles in service, two addresses inside the ADA corridor and one address with the label displayed outside of the ADA Corridor. This feature can be very useful when you Show a Trip on a Map as well because you can see the start and end point of the trip in relation to the KML data whether it's an ADA Corridor, City Limits, Fare Zones or other useful map data.
How to set up KML Layers
First you need to have made a .kml file that you want to display. Contact Easy Rides support for more information if needed. Once you have a .kml file, You need to store it somewhere that can be downloaded from a URL and you'll need to copy that link.
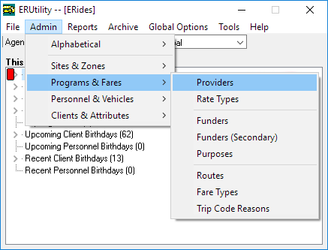
Next, Open the ERUtility3 and go to the Admin menu then Sites and Zones then KML Layers.

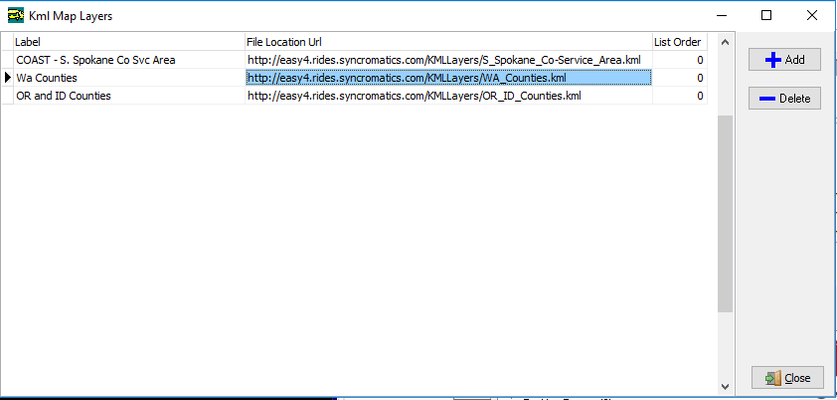
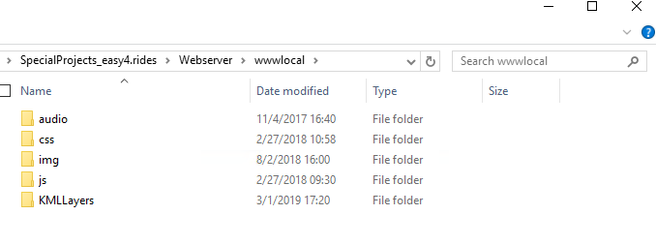
Open the Kml Map Layers menu item then click the Add button. The Label is the name you'll see for the KML Layer on the Easy Rides Map select interface. If you have the ERWebServer (tablets, web ride request, etc.) you can locate the .kml files in the wwwlocal folder under a folder such as "KMLLayers". Its' best not to have any spaces in the folder name or the KML files. By putting the files inside a folder in wwwlocal, your ERWebServer can host the .KML files. In the Utility, you just enter your tablet URL (including ports for http NOT https) followed by "/Foldername/Filename.kml" For example, http://easy4.rides.syncromatics.com/KMLLayers/WA_Counties.kml as shown below. Again, use the http URL and port and not the https URL. You can label each and that's how it will appear in a map under "KML Layers" on the list. The List Order simply controls the order from top to bottom you would like them to appear. Setting them to the same List Order number alphabetizes them.
After restarting Easy Rides, your KML layer will be available to add on a map in Easy Rides.
If you're using Google Drive to store your KML file, you'll need to modify the link first
Original Sharable Link from Google Drive: https://drive.google.com/open?id=1-qG5i89mXfDkhSPhfGcWa_-7wHC3RTUB
Copy the original link AFTER the "id=". For the above example it would be 1-qG5i89mXfDkhSPhfGcWa_-7wHC3RTUB
Use this template: https://drive.google.com/uc?export=download&id= and paste the copied ID onto the end after the = like this:
https://drive.google.com/uc?export=download&id=1-qG5i89mXfDkhSPhfGcWa_-7wHC3RTUB
OR
Get the original Sharable Link from Google Drive by right clicking on the file and "Get Sharable Link". Here's an example: https://drive.google.com/open?id=1-qG5i89mXfDkhSPhfGcWa_-7wHC3RTUB
Replace the beginning of the original link up through "id=" with https://drive.google.com/uc?export=download&id=
To end up with this (for this example): https://drive.google.com/uc?export=download&id=1-qG5i89mXfDkhSPhfGcWa_-7wHC3RTUB
Use the modified link in the Kml Map Layers edit in the Utility as described above.
Client
Adds the Client's home address on the map.
AVL
Adds the AVL map with the selected vehicles to the open map. This is very useful for seeing the nearest vehicle to a client or trip.
Segment Info
Every time time Easy Rides sends a request to Google Maps to look up the driving directions between addresses it costs money and takes a little bit of time. Not much of either, but it adds up. To improve efficiency and speed, Easy Rides stores each of those look-ups in the Segment Info cache. That way when information is needed from a segment that's been looked up before, Easy Rides can use the cached information instead of sending it to Google again. Sometimes, the time or distance between two addresses is different than what you think it should be - that's where Segment Info comes in. Use the Segment Info feature to compare the recorded info to the returned info that Google looks up right now. If the cache is off and you'd like to update it, you can easily do so by clicking the Save Returned Info button. See a more detailed article here: Recognize and Update Segment Info
For more information on mapping features, click here.
Easy Rides Dashboard
In the lower right corner of your Easy Rides screen is a new button for toggling a side panel called the Dashboard.
Click this button to see the Dashboard:
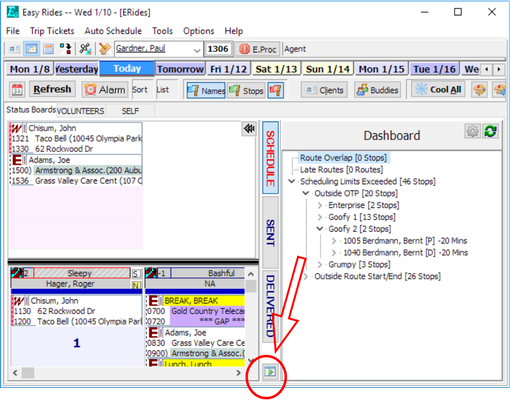
The Dashboard shows 3 sets of data to help spot possible issues with your schedule.
1. Route Overlap - Spot trips on separate routes that might benefit from being put onto the same route.
2. Predicted Late Routes - This highlights which parts of which routes might run late, allowing you to use the edit route on map tool to hone in and fix thise trouble spots on the route.
3. Scheduling Limits exceeded - If a trip has been adjusted more than 15 minutes from it's requested time, or if the trip is scheduled before the start of a route or after the end of a route, the trip will show in this list. Future releases will have more granular control over the allowed adjustment window.
For a webinar covering the dashboard feature, click here.
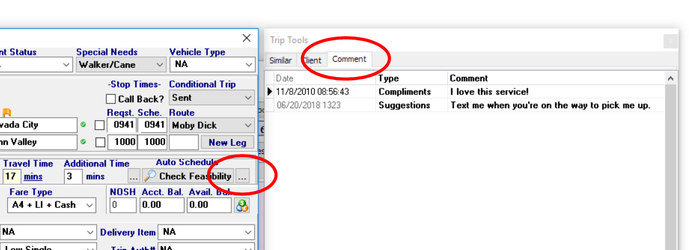
Client Comments Added to Trip Tools
Shows tab on the Trip Tools form displaying Client Comments on file. Client comments are added/managed from the Clients screen.
Lowest Cost
Now Easy Rides can display lowest cost Provider and lowest cost Fare Rate right on the drop-down list in the trip form as you're booking or editing a trip. In order for it to work properly, you must first enable the feature, restart Easy Rides and the trip must have the addresses and times filled out before selecting Provider or Fare Rate so that mileage and time calculations are done and ready to calculate into the rate for the Provider or the Fare Rate.
Lowest Cost Provider
This feature when enabled, allows you to see the lowest cost provider of a trip while booking. This useful when a provider has only one rate type and that rate type is associated with the provider in the Utility.
1. Enable the Feature
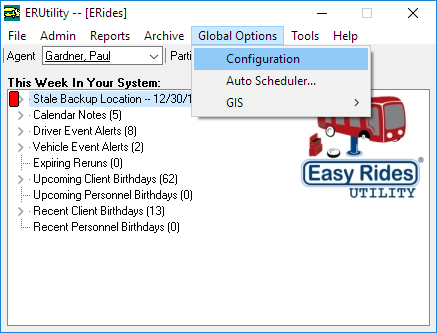
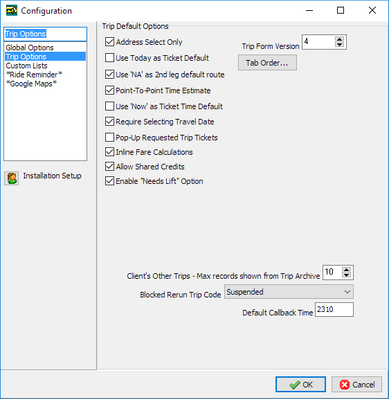
Open the ERUtility and go to Global Options>Configuration then click on Trip Options. Click the checkbox for "Inline Fare Calculations".
2. Associate a Rate Type with a Provider
Associating a rate type with a provider is only good if you can only use ONE rate type with a provider. Once you set this, you can't select other rate types in a trip form because the associated rate type will continue to load.
If you need to create a new rate type that is unique to a provider so that you can associate it with the provider, open the Utility and create those Rate Types as needed.
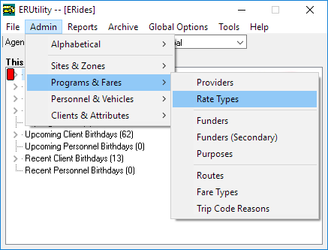
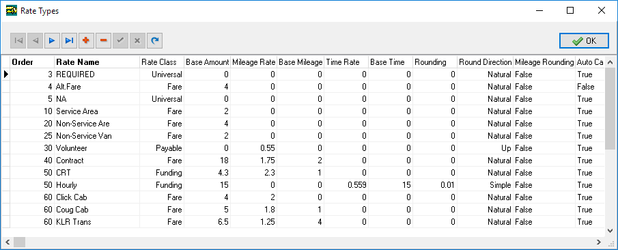
Don't forget to configure the Base Amount, Mileage Rate, Base Mileage (if any miles are included in the Base Amount), Rounding, Round Direction and Mileage Rounding accordingly.
Once you have created all of the Provider Rates that you need, go to the Providers in the Utility.
![]()
Click the Fare Rate drop-down to the right of the Provider and select the rate type to associate and load when this provider is selected in a trip form.
3. Restart Easy Rides
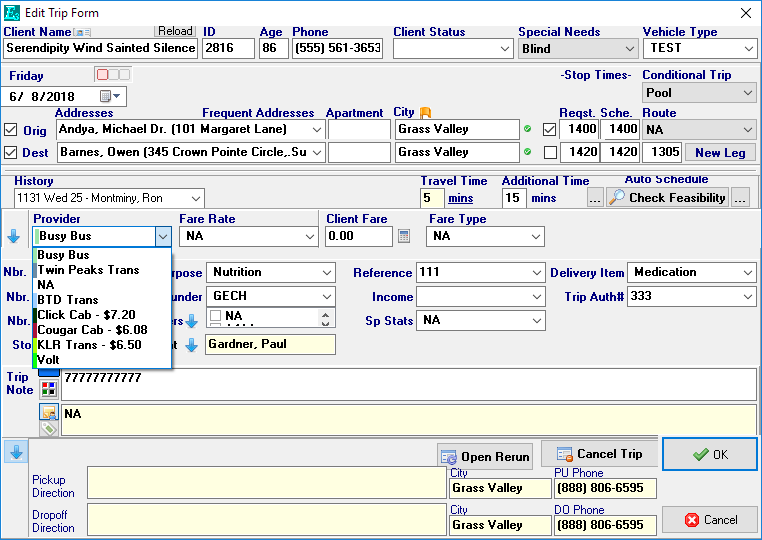
In the example below, there are three contracted providers that each have an associated Fare Rate. When you set the addresses and times on a trip you can then click the Provider drop down and see which Provider would be the least expensive for this particular trip. As you can see, Cougar Cab would be the least expensive for this trip.
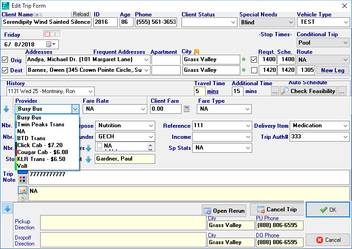
Lowest Cost Fare Rate
You can also check the lowest cost Fare Rate. This is useful when the Provider does not have a single associated Fare Rate setup in the Utility or when a Provider has more than one Fare Rate. Enabling the "Inline Fare Calculations" as described above also enables the Fare to be displayed on the drop-down list for Fare Rate.
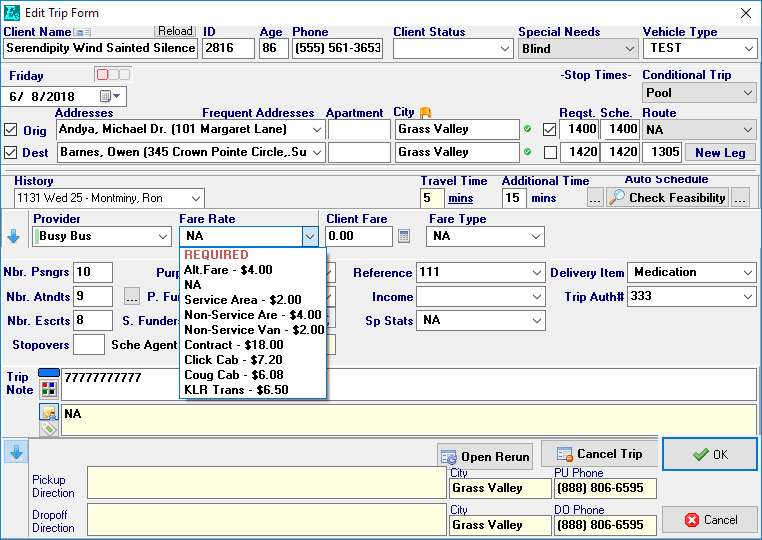
Here are some examples of trips where because of the rate structure of each provider and the distance of the trip, you can see that it's not always the same provider that's the least expensive.
![]()
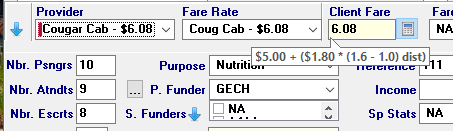
Same trip above, but Cougar Cab is less because of the lower boarding fee of $5 and the short distance of the trip. When you hover the mouse of the Client Fare it displays how the fare was calculated.

![]()
In the next trip above, KLR Trans is less. Even though KLR Trans has a higher boarding fee, the first four miles are included. The longer trip is 8 miles in total, so the lower mileage rate and more included miles really make a difference here.
Shared Credits
Shared Credits is a new feature (if your organization has the Client Credits feature) that allows clients to share their credit account with other clients. This is especially useful for families, businesses or funders that want to deposit ride funds into their account and allow designated clients such as other family members, employees or service recipients to draw down from the master account when scheduling and taking trips.
1. Enable the Feature
Open the ERUtility and go to Global Options>Configuration then click on Trip Options. Click the checkbox for "Allow Shared Credits".
2. Restart Easy Rides
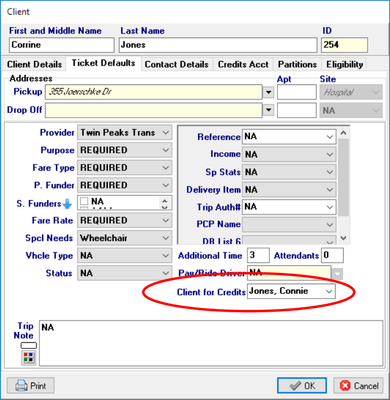
To use the feature, first you need to specify in the "master account" client's file in Easy Rides that they can share their credits. The option is found in the client file under the Client Details tab. Here we're going to setup Connie Jones as the "master account" to share credits with her family.

Next, we'll setup the family members. Here we're setting Corrine Jones as a family member that can draw credits from Connie's account.
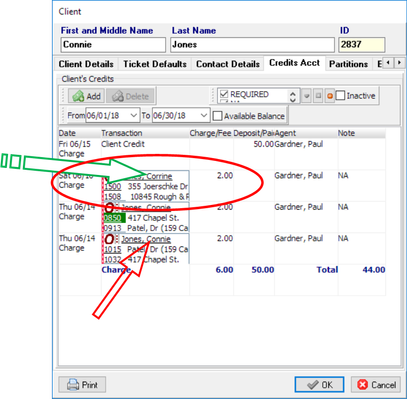
When Corrine books and takes trips using the Fare Type that the credits are deposited in (in this case "Charge"), the credits for the trip will be deducted from Connie's account. Below shows Connie's account with three trips - two for herself and one that Corrine took that deducted from Connie's account.
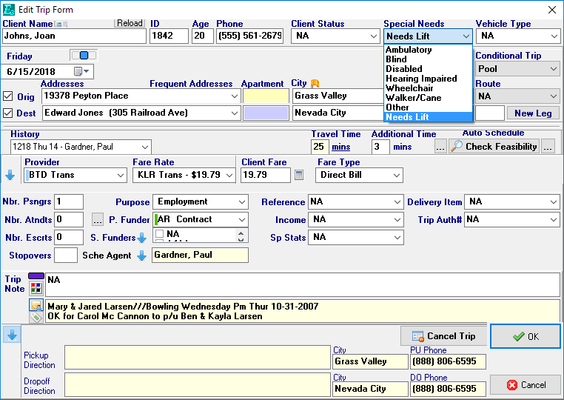
Needs Lift
We've added a new Special Needs item called "Needs Lift". This is useful for someone who is ambulatory but needs to board the vehicle using the lift because they have difficulty navigating the steps.
1. Enable the Feature
Open the ERUtility and go to Global Options>Configuration then click on Trip Options. Click the checkbox for "Enable "Needs Lift" Option".
2. Restart Easy Rides
In a Trip form use the "Needs Lift" option from the Special Needs drop-down.
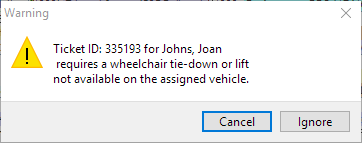
If you try to assign a trip with "Needs LIft" to a route that is assigned a vehicle that does not have any WC seating capacity (as configured in the vehicle in the Utility), you will see the warning below.
Google Options
In the Utility under the Global Options menu you can set preferences for Avoid Tolls and Prefer Fastest or Shortest Route.
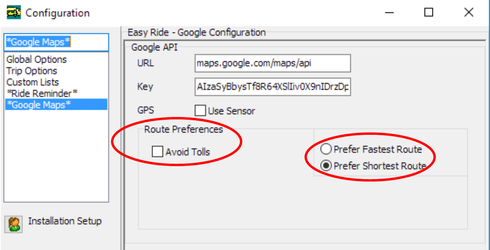
Avoid Tolls
Tells Google to avoid toll roads when calculating a driving route between two addresses. Avoid Tolls seems to apply only to roads or bridges that have tolls and does not avoid other options that cost money such as ferries.
Prefer Shortest or Quickest Route
It is important to understand, that Easy Rides will send these requests on to Google when asking for a calculation or driving directions but Google will provide their version of "Fastest" or "Shortest". You may know of a faster or shorter route, but we can only ask the question of Google and we get what Google returns to us. For instance, a "Shortest" route may involve driving on forest roads or taking a ferry across a body of water. Below we'll look at the same trip going the same direction between the same two addresses. The options used were as they appear in the screenshot above with "Avoid Tolls" not checked and "Prefer Shortest Route" Checked.
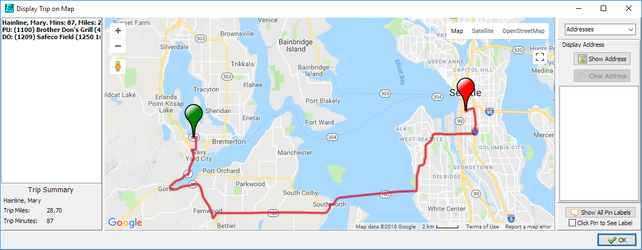
In the examples below, you can see that in Easy Rides Google gave the results for the "Shortest Route" between Brother Don's Grill in Bremerton to Safeco Field in Seattle which include taking the Southworth Ferry for a total of 28.70 miles.
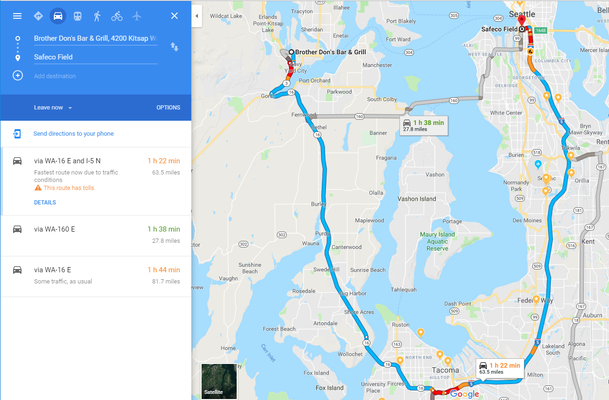
Using the same exact addresses in a Chrome browser directly in Google Maps we get the result below which has us driving around the Puget Sound through Tacoma and staying off of the ferries for a total of 63.5 miles. Notice that Google does display an option for the Southworth Ferry (if you drag and drop the blue route to the path with the ferry on it), but what is displayed is their recommended choice (maybe because although it takes a little longer, the bridge toll is less expensive than the ferry?).
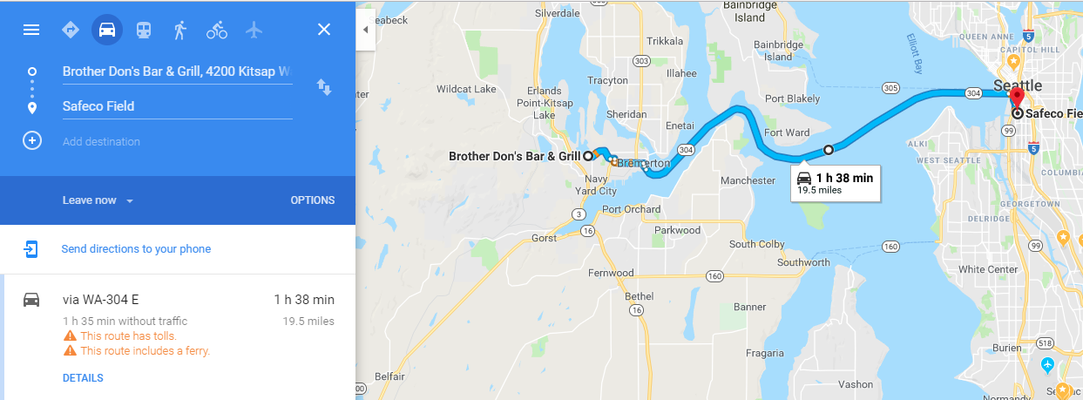
Finally, in the shot below we can see what the locals would consider the shortest route at only 19.5 miles, which is taking the Bremerton to Seattle Ferry. Interestingly, Google doesn't even offer this route in the browser! This option (depending on your timing, ferry schedule, luck, traffic, etc. might be the shortest but in this example is 1hr and 38 min so it's longer than either options above. Note that your vehicle isn't actually driving for MOST of those 19.5 miles you're sitting parked on the ferry with the engine off.
The main point to the examples above about "Shortest Route" is this: It's really "Shortest REQUESTED" route, and we don't have any ability to control the results that Google gives us once we ask for what we want. Depending on where you operate however, you'll probably find it does a pretty good job most of the time with returning the results you expect.
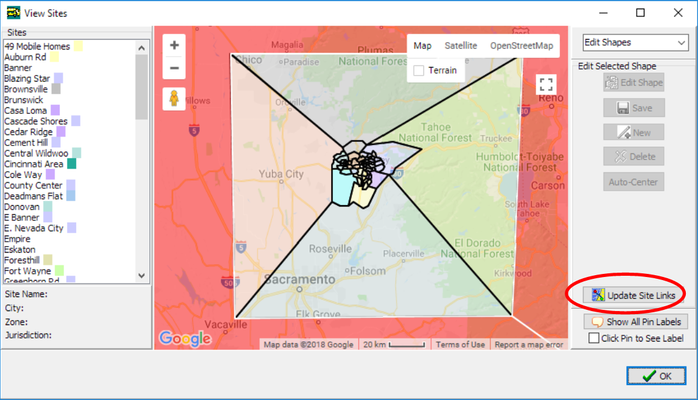
Improved Site Editing with Google Maps
Improved editing of sites including Update Site Links button. For more information, see Using the Sites Editor article.
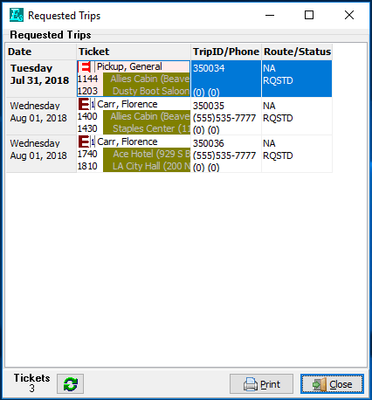
Pop-Up Requested Trip Tickets
If you have the feature that allows clients or guests to submit their own ride requests online from their mobile device or web browser, the trip tickets come into the Requested tool, but this version makes the Requested trips pop up so it's more obvious that you have pending/requested trips that still need to be handled. From the popup window, you can open these tickets and edit them. Set their Trip Code (labeled "Conditional Trip" in the trip form) to anything other than Requested to move them out of this special area of trips not yet processed.
Funder Eligibility
This feature provides a way of setting validation dates for funders that require eligibility in order to pay for trips. There are two parts to setting this up as outlined below.
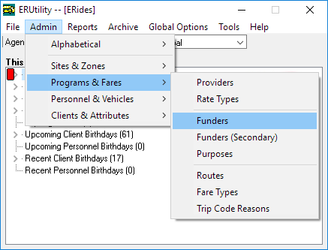
1. Setup Funders in ERUtility
Go into the ERUtility under the Admin menu and Click on Funders.
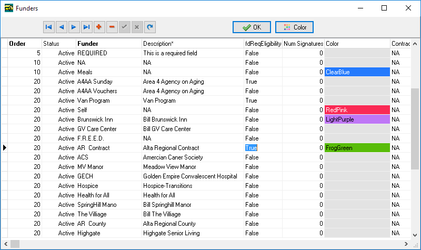
Locate the Funders that require date based eligibility and set the fdReqEligibility item to True. You'll have to select the text and type it in. You might also have to scroll to the right to find the fdReqEligibility column, and by then you might lose sight of the Funder names. You can click and drag the column back to the left and drop it where you want, somewhere near the name of the Funder. You can also drag and drop other columns into your preferred order. Don't get too carried away though, at this time rearranging the column order is not saved and will return to the way it was the next time you enter the screen.
2. Restart Easy Rides and use the feature
After restarting Easy Rides, go into a client file that is eligible to have trips paid for by a Funder. Click the Add button, select a Funder from the dropdown, set the begin and end dates and type in any notes as needed and click OK.
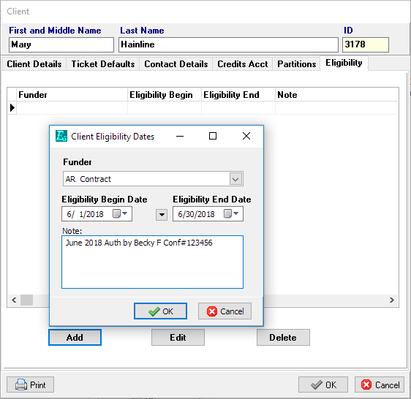
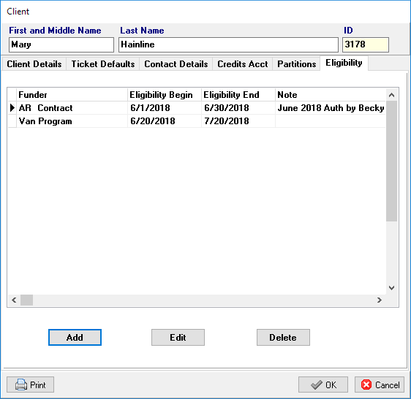
You can add multiple Funders and even multiple entries for the same Funder (with different date ranges).
When you create or open a trip, the Funder is checked for three things: Is Eligibility required for the funder? Does the client have an entry in the Eligibility list for the Funder? And Is the trip within the allowed date range of any of the entries for the chosen Funder? If Eligibility is required, but there is no entry or valid date range in the client file for that Funder, you'll see an error like the one below.
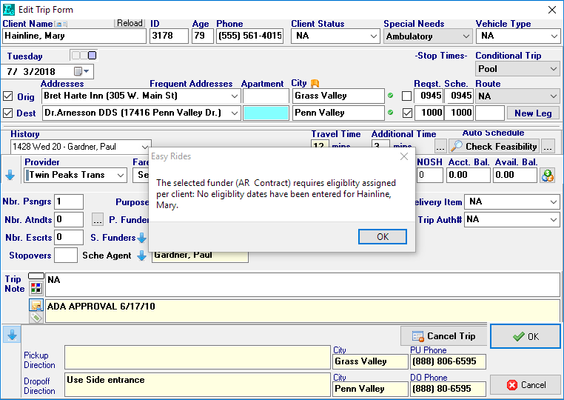
Of course if it all checks out, then the trip can be scheduled.